HOUDINI SNIP
Nearly every place I ever worked, needed a tool like Houdini Snip. Hope it proves useful!
Houdini Snip, is a tool that allows you to take any selection in Houdini and save it quickly and efficiently into a .snip file. Others can quickly and easily load these files. All connections and items are preserved, and come in a the same relative positions. Nice!
Every .snip gets loaded with a surrounding Network Box with a comment with the path to the source to help you keep track of what’s coming in.
It’s easy to deploy: just pop the HDA into a folder that Houdini picks up OTLs/HDAs from, start Houdini, and the Snip tools will be there in the Tab Menu.
You can opt to Save and Load by browsing to a location, and the quick modes come preconfigured to save to $USER_DIR/$DATE/$USER.
It is easy to change - just see the documentation - to any location of your choice.
The tool is a full commercial file, and is unlocked so all the code can be expected and modified. Please consider paying what you want, especially if for multiple users. I put it back in to making content (largely for free).
The codes is visible and commented, so I hope proves a useful as a learning aid.

Note: 19.5 users, Python 3.9 changes the default from $USER/Documents to $USER. Copy your snip library there if required, or use Browse to browse to old libraries.
INSTALLATION
Check you are running Houdini 19.0+, running Python 3.4+. The tool will not if you don’t meet these requirements.
Drop the HDA into any path that picks up HDAs or OTLs.
For example C:\Users\Richard\Documents\houdini19.0\otls is one on windows.
Most studios have folders for different purposes, so if check in with Pipeline or Supervisor on where to place.
If you do update the tool, be sure to remove the old one!
USE
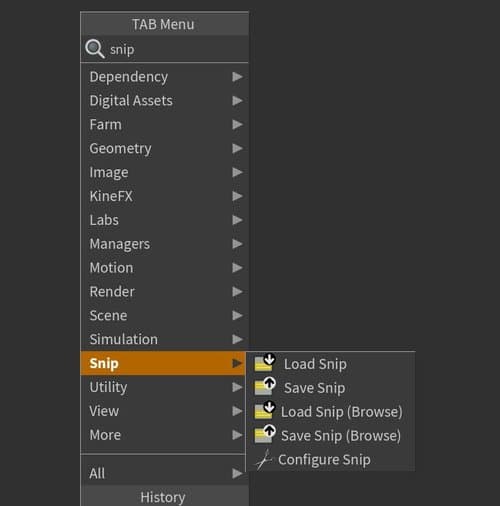
Once installed, and with Houdini open, hit TAB in a Network Editor. You see a few options:
- Load Snip, presents a browsing view of the root folder, for you to select a Snip to load..
- Save Snip, after selecting some nodes, click this to save to configured path. Only alphanumerical and underscores supported.
- Load Snip (Browse): Browse to any .snip file (including those outside the configured path) and load in the Snip.
- Save Snip (Browse): Browse to any .snip file (including those outside the configured path) and load in the Snip.
- Configure Snip: This will only be available in the /out context. This node configures how the paths are constructed to where thins are saved. Discussed later.
TIPS
When using Load Snip use the Filter to narrow down what you are looking for:
- Filter by node category
- Keywords
- Filter by date (if you have that configured.
You don’t actually need the “*” - I found this out later! Be aware of the right click menu that allows you to expand and collapse the tree too.
CONFIGURE HOTKEYS
In Houdini, Go to /out in a Network Editor, Hit Tab Click Snip, Click Configure Snip. You will see two button labelled Add To Hotkey Editor and Remove From Hotkey Editor, and Remove From Hotkey Editor.
ADDING HOTKEYS
Whilst the Hotkey Editor is closed, press Add to Hotkey Editor. Open the Hotkey Editor and search “rict”. They should show up. Please add whatever key mappings that suit you. Refer to Houdini Docs if needed.
REMOVING HOTKEYS
Whilst the Hotkey Editor is closed, press Remove From Hotkey Editor. Its recommend to restart Houdini.

CONFIGURE PATHS
By default, the root save is $USER_DIR/$USER/$DATE.
On Windows for me this resolve to C:\Users\Richard\Documents\houdini_snip\2022521\Richard.
Likely, you will want to change this to a Network Drive. At work, we always map to a project - as most the time people are sharing Snips on the same Project. And we rely on the Browse Tools to bring things from other projects. It’s very possible to come with some very sophisticate logic, to create some neat behaviour, as it all Python based.
Houdini Snip works with two paths:
- root_path - parent path where all scripts are saved. This is where Load Snip looks for Snip files.
- save_path - the path under (or the same) where the Snips are actually written.
They can be identical (if you prefer a flat single folder with everything in), if not, save_path has to be contained in root_path,
You require write permissions to the HDA. If you do configure say in an Indie License, you be limiting the use of the HDA to an Indie License. Snips also respect Houdini licensing - if you save from an Indy License, you will only able to load that Snip by using an Indie License,
STEPS
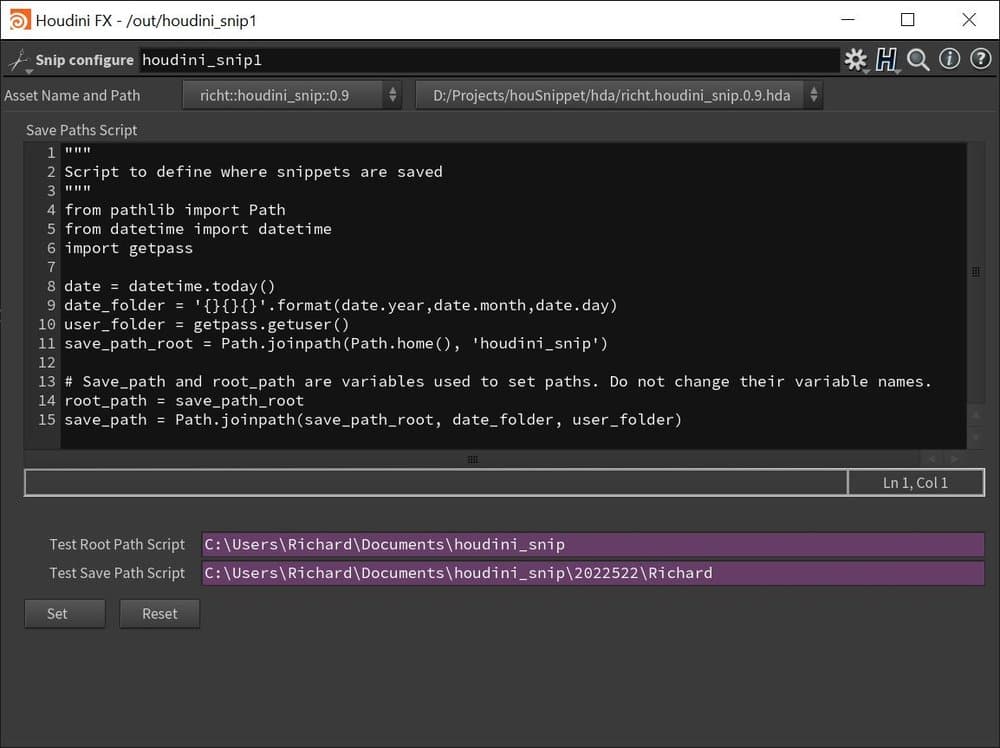
In Houdini, Go to /out in a Network Editor, Hit Tab Click Snip, Click Configure Snip. This will create a node. With a parameter interface seen to the left.
In the “Saves Path Script” parameter you can see a Python string, this forms the paths.
Test Root Path Script and Test Save Path Script, evaluate the code, to show how you how your changes will resolve to a path.
Once you are happy Click Set and your changes will be saved and become active for everybody using the HDA (once they refresh their libraries).
If you make a mistake, Click Reset to restore the factory default.
That’s it.
If you are familiar with Houdini and HDAs, you can change the get_paths method found at the top of the Node Type properties Python Module.
RECIPES
Here are some recipes to give you some ideas of the possibilities. We utilise Pythons 3.4 pathlib. This is great at dealing with OSs and comes with handy methods like join and parent.
Docs for it can be found here.
Relative to Hip:
Paths formed relative to the Hip. This method works great if your Pipeline sets $JOB or other Houdini Environment Variable. Remember, you can always use Load/Save Browse, to go outside the configured saved paths.
from pathlib import Path
import getpass
import hou

user_folder = getpass.getuser()

# Save_path and root_path are variables used to set paths. Do not change their variable names.
root_path = Path(hou.text.expandString('$HIP'))
save_path = Path.joinpath(root_path, user_folder)));
Environment variables:
Very similar to above, this time using the General Environment Variables.
from pathlib import Path
import getpass
import os

user_folder = getpass.getuser()

# Save_path and root_path are variables used to set paths. Do not change their variable names.
root_path = Path(os.getenv('HIP'))
save_path = Path.joinpath(root_path, user_folder)
Hardcoded Root: Use a hard Coded path - useful if you want a site wide root folder.
from pathlib import Path
from datetime import datetime
import getpass

date = datetime.today()
date_folder = '{}{}{}'.format(date.year,date.month,date.day)
user_folder = getpass.getuser()

# Save_path and root_path are variables used to set paths. Do not change their variable names.
root_path = Path.joinpath(Path('D:\Site'), 'houdini_snip')
save_path = Path.joinpath(root_path, user_folder)
Simple Hardcoded: The most straight forward - full path coded. Notice the before the quotes and path. This make the string “raw” so that Window’s back slashed paths don’t confuse things.
from pathlib import Path

# Save_path and root_path are variables used to set paths. Do not change their variable names.
root_path = Path(r'C:\Users\Richard\Documents\houdini_snip')
save_path = Path(r'C:\Users\Richard\Documents\houdini_snip')
CLOSING
Please consider subscribing if you’d like to keep updated with what I’m up to or follow me on Twitter DoesCG.
Thanks to Gary Prysbet & Dennis Petkov for the ideas and tips on this one!.
UPDATES
19.30 GMT 2022-04-22, version 0.9
- First Release. 20:00 GMT 2022-04-27, version 1.0
- Fixed Sop load. Now make object if can’t find a Sop Network Editor.
- Add and Remove hotkeys added. 19:00 GMT 2022-04-28, version 1.1
- Minor bug fix - default save folder needlessly created. 19:00 GMT 2022-04-31 version 1.3
- Minor bug fix - error in message of bad characters in name. 19:00 GMT 2022-07-26 version 1.4
- Fixed error on picking snip of Parameters Pane.
Proposed Updates
- Pop-up suppress user-pref option
- Comments enabled - non-browse modes only