OPTIMIZING ALGORITHMS IN HOUDINI FOR TDS AND ARTISTS
I think the true power of Houdini is that it allows an artist to solve technical problems and leverage technical processes to make beautiful things and solve complex problems from a high level.
As we connect nodes, write VEX in wrangles or wire Vops together, we are creating a set of instructions or rules, that given a set of inputs - for example geometry data or user input - output a result.
These sets of rules and processes are algorithms. An algorithm is an umbrella term used to describe any process or set of rules that can be followed - usually a computer.
This reality can feel distant as we work in Houdini’s environment concentrating on aesthetics and solving our problems, but to think of our graph of nodes and lines of VEX as algorithms can help us improve our workflow, setups and productivity.
Sometimes we create an algorithm that has the desired output when given a valid input. However, it may not always do it at the appropriate scale, within an acceptable time, or within the available machine resources.
In other words our algorithm needs to:
- Sufficiently scale. For example, if your algorithm makes procedural rocs, it needs to be able to create geometry of a certain density to hold up.
- Evaluate fast enough. For example, if an artist needs fast feedback in order to interact fluently with it, an Artist will not be able to use it effectively if it takes too long to reevaluate or cook.
- Do it within the available machine resources. If your algorithm cannot stay within a machine's resources whilst evaluating, it will frequently overwhelm the machine causing work to come to a halt.
In this article I outline my process of how I prepare and optimise my algorithms in Houdini to hit performance requirements. Although written from the perspective of an artist/TD working in Houdini within the Sop context, most principles should apply to Houdin’s other contexts, and broadly it should be useful in creating algorithms in other software or programming languages.
DEFINE REQUIRED PERFORMANCE AND GATHER TEST DATA
Before I start to develop any algorithm, I define what the appropriate levels it needs including:
- The scale of data it needs to process.
- The speed it needs to evaluate.
- The machine resources it’s expected to work within.
Then I gather test data and inputs representative of what it will have to operate on.
Ideally this test data will span the simplest to the most complex scenario and cover a wide set of variations. At worst, you can create your own test data and swap it out with the real stuff when it’s available. But the better and more varied your test data, the more reliable your picture of the performance of your algorithm and the subsequent decisions based on it will be.
You may be building it just for yourself, but if you are going to be using a setup a lot and/or it is critical to a project, it’s worth taking the time to define your performance requirements and create your test data.
FIRST PASS - PUTTING THE “PRO” IN PROTOTYPE
I always recommend prototyping the simplest and most straight-ahead solution first - even if you know it will not meet the requirements. It will provide you with a base-line to measure variations of different approaches and their suitability for your needs as well as provide insight to the problem beyond your initial assumptions.
Try to construct your node graph in clear functional steps and blocks in logical groups, and avoid writing complex Wrangles of Vop Networks. Instead break them down into small meaningful components. Leverage Houdini’s default nodes where you can rather than investing too much time creating custom components.
This will aid in later steps - if you need to improve performance as it will allow you to easily swap out different sections and compare different ways to solve specific parts of your problem.
Above all, try to avoid getting too bogged down on this first pass.
MAKE A SPREADSHEET
If I am reading this in the future, and I’m thinking of skipping making a spreadsheet, I’d like to take this opportunity to say to my future self:
“Rich, just make the frigging spreadsheet. It doesn’t always help, but when you don’t it screws you. So make a frigging spreadsheet.”
Spreadsheets work for me, but I’ve seen people use sticky notes in Houdini or pieces of paper. Find something that works for you. The important thing is you have a way to record and take notes as you progress.
BUILDING UP A PICTURE OF PERFORMANCE
Using your first pass, use your sets of test data to and record the performance of the algorithm.
I use a combination of the Performance Monitor, Node Info and a System Resource Monitor of the OS. I record the results in the spreadsheet.
Does it meet all the requirements you set?
If it does, awesome. Put a bow on it. You are done :-)

... but most likely it doesn’t and you are not.
I then break down each component or step and build up a picture of how each component of my prototype contributes to the ways in which it falls short. This gives me a good idea of where the problem areas are.
I tend to create a base-line line sheet/tab and record each component.
Once I have this picture, I try to understand how each expensive component is evaluating in part or entirely by 2 types of execution:
- In parallel
- In serial
These 2 classes are a simplification. They should be regarded as an approximation of what is actually going on in Houdini and your system. Let’s take a moment to define these 2 terms
IN SERIAL
Evaluation sequential. The next step cannot start before the previous has completed.
In the context of a For Look, it’s like emptying out a bathtub with a cup:
- Get a cup.
- Fill the cup with bath water.
- Dump bath water over the side.
- If the bath isn’t empty, repeat from step 2.
Regardless or how many people are in the bathroom, they can’t speed anything up as you only have one cup - much like your cores on your multi-threaded CPU. In serial only one step can be carried at once. The job will get done, but it will take a while.
You’ll find it in:
- Any Sop nodes inside For Loop unless the loop is contained in a Compile Block with the loop set to use “multi thread when compiled” and there is no feedback or dependency from a previous iteration.
- Connected nodes one after another. Each one must evaluate first before the next can.
- A VEX loop’s iterations runs in serial - each iteration has to finish before the next can start. However, they can be placed in a Parallel context such as running over elements - points,Vertices, primitives and so on - each element will be running its own loop in Parallel with the separate iterations of each loop iteration Serial still.
IN PARALLEL
Evaluating multiple simultaneous or concurrent chains on your CPU across multiple cores.
Like emptying out a bathtub with 10 people, each with their own cup. Everybody is allowed to execute the set of commands simultaneously:
- Get a cup.
- Fill the cup with bath water.
- Dump bath water over the side.
- If the bath isn’t empty, repeat from step 2.
The job will get done faster but may take more resources - people and cups!
You’ll find it in:
- Many of Houdini’s default nodes work in parallel in part or entirely, processing elements - Points, Vertices, Prims - which become the basis of parallel chains of instructions.
- When you use a Vop or Wrangle, the elements you pass all run in parallel. For example, if I have a wrangle running over points, then effectively each point has its own discrete chain of processes unaffected by other processes running other points.
- OpenCl - but like Jeff Laits says… “Just use VEX”. See further re-reading.
- Sop For Loops in a Compiled block with “Multi-thread When Compiled” enabled on the loop with no feedback from previous iterations.
PARALLEL VERSUS SERIAL
Depending on the context and complexity of scenario their properties can be leveraged in different ways to achieve efficiencies. Here’s a slightly more involved example that illustrates this.
Imagine a branching structure of connected points (in magenta) with a fixed root point (in cyan). Our algorithm needs to create an Integer Point Attribute called “Step” that is the number of points between it and the root point.
Figure A.
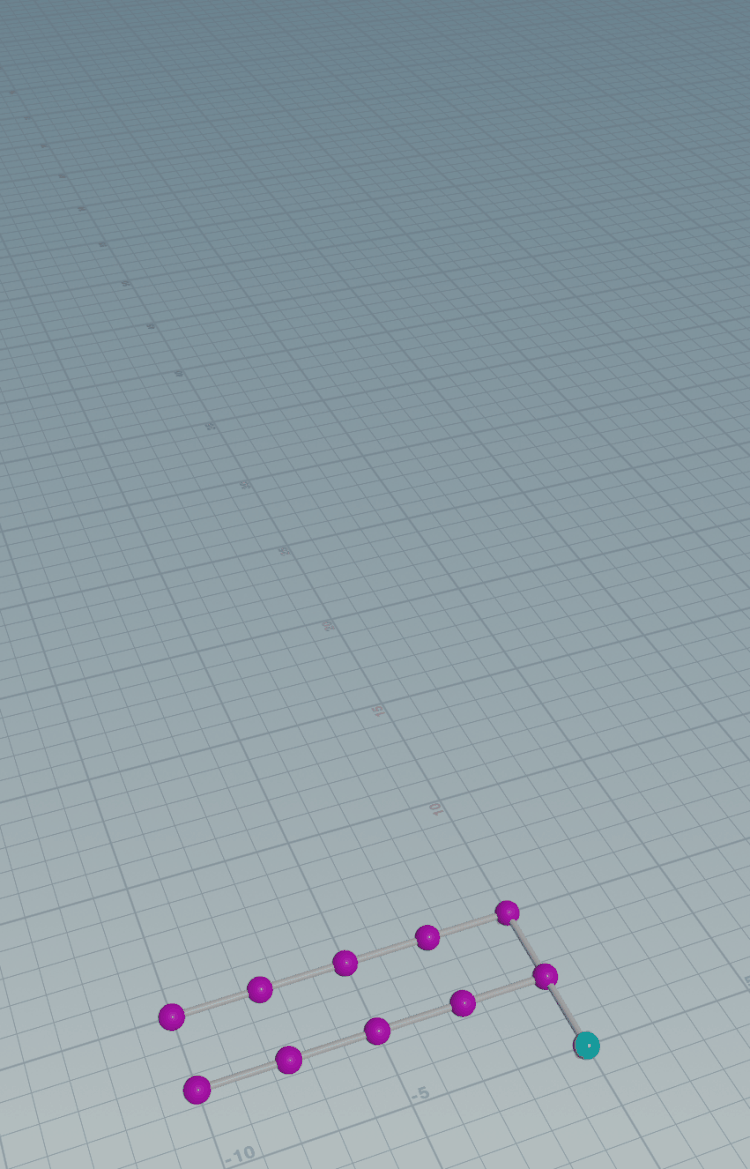
Figure B.

One could step along from the root point to the tips of the structure for each point in parallel (Figure A). Each parallel chain is visualised in a separate vertical layer.
Each point would have it’s own separate chain of commands in a for loop. At each iteration of the step of the loop, the counter would increase by 1 and step along the structure’s point (in yellow) until the target point whose “step” attribute we calculated was reached (in red). The count value would be written to that point’s “step” attribute.
Parallel elevation ensures a short chain of commands. However, the net computation cost (reflected by the number of yellow spheres) is high, as points are counted numerous times repeatedly.
With sorting and preprocessing one could engineer a serial evaluation such as Figure B.
Here a single chain of commands executes in a carefully defined order such that starting at the root point, each point is stepped a long, the counter is incremented and the “step” attribute set on each point.
The eagle eyed among you will notice, this will break when we begin to step down a secondary fork. The counter will be invalid as the previous point was not connected to the point - it was a tip point from another branch. To cope with this, the new fork would need to retrieve the “step” value from its parent, and then continue to step and iterate over the structure until all the points have been set. This would involve storing in memory the parent step value and then later retrieving this data when it’s child required it. These extra steps would take additional resources and computation, but the overall computation efficiency (no wasted yellow points) may make it more efficient despite this.
Evaluating serially usually creates a longer chain of dependent processes, meaning that to fully evaluate an input can take time but it can be more efficient. This is because subsequent steps can reuse data from previous iterations of loops efficiently if the components of the algorithm are staged and designed well. However, at some scale the initial ordering of the points, and the additional steps of storing and retrieving the data from memory may cancel out any efficiency gained. Therefore, the best method to use should be determined by your test data as it emulates the scale of inputs it has to operate on.
In Computer Science, Big-O notation is used to describe the worst case of how an Algorithm cost increases as the input scales towards infinity. It can be very useful to think about your algorithms in these terms. It is well worth the time to familiarise yourself with it - more info here.
Finding the best way to stage your algorithm, balance the flow of execution, and structure data so it can be both stored and recalled from memory efficiently is an artform. Experiment and you may be surprised what can be achieved.
THE RE-JIG - A MERRY DANCE
Now we have established some broad understanding on how Houdini evaluates, let me run through a few strategies I use to improve performance. I try to tackle the areas that are the most costly first - you will find your biggest gains there.
Each time I create a variation I record the results and describe changes in my spreadsheet.
INTRODUCE PARALLEL EVALUATION WHERE POSSIBLE
Try placing chains of nodes in For Loops running in Compile Blocks.
One tends to say “Why should I run over the “pieces” in a For Loop when I want to process everything? You should be asking yourself “is there a reason not to?”. Often you can get a faster evaluation of nodes if they are processing smaller “pieces” of the same data.
For example some node’s computation cost increases exponentially as the complexity of their inputs increase, therefore processing many smaller bits can increase performance.
Perhaps you have very complicated loops of VEX code in a Wrangle? Does every single line need to occur in the loop? By being there, it ties it to the serial evaluation of iterations of that loop, thereby slowing performance. Perhaps parts could execute upstream in much simpler and faster parallel processes, the data stored for use in your more involved loops downstream.
CREATE DATA ONCE, STORE AND REUSE MULTIPLE TIMES
Are there sections of your graph or lines of VEX that reoccur? Perhaps they have common preceding steps, or can be made to? In these cases, you can try moving these nodes and VEX commands upstream where they can evaluate and attach data for multiple re-use downstream.
CREATE AREAS OF STATIC DATA
If a node’s inputs are changed - the data coming in through an input connection or a parameter is changed - it needs to reevaluate. Look for processes, nodes or calls that re-evalute over again and produce the same result.
If you structure your node graph so that frequently changing data is downstream of the operation producing unchanging results (or near enough) you will find your algorithms will be much more interactive.
For example, if your algorithm operates within a frame range, you can split the graph and freeze a frame via a Time Shift node and perform the operations that are unaffected by the changing inputs over time. On that spur of the graph, Houdini is smart enough to know that this input is static so it will not re-cook it as you change frames. The result of these operations the frozen spur can be copied over to the animating portion of graph to be used by subsequent nodes.
Similarly, steps that receive frequently changing user input should be moved downstream.
Note, in many cases you will introduce new operations which will have a computational cost and use memory, so that must be assessed.
DIG FURTHER
The Performance Monitor and node info will only give you insight down to the node level, and if you have nodes inside a Compile Block you will only be able to see statistics from the Compile Block as a whole.
Furthermore, simply isolating the areas of interest in your graph to measure their performance can either make the graph unable to evaluate or the measurements invalid. So take the time to create simple test graphs and setups where you can pinpoint and isolate the areas of interest. Misleading information is worse than useless… unless you find wild goose chases scenic.
ORDER OF OPERATION
If a chain of nodes/operations produces the same result (or does not change meaningfully) when you change the order of those nodes/operations, it does not mean that a different order of those same nodes/operations will have the same performance. For example one could have a model that contains several packed primitives. The desired result is to have all the primitives with the word “red” in their “name” Attribute deleted, and the geometry unpacked.
One could either:
Unpack it, transferring the name attribute to the unpacked prims, and then blast the away primitives using an expression of @name==”red”.
Blast the away packed primitives matching @name==”red”, and unpack.
Other than with the simplest of models, B. will be orders of magnitude faster.
Because with B. you will be deleting fewer primitives so geometry modification is lighter, and then the Unpack has less to unpack.
Watch out for these and re-order them to the best configuration.
EXPERIMENT WITH COMPILE BLOCKS
Aside from the parallel evaluation, Compile Blocks bring other performance. Enclosing nodes inside a Compile Block allows a group of nodes to act on geometry “in-place”. This is opposed to each node creating its own copy of the geometry in memory, bringing about memory efficiencies.
From my experience, finding the best portions to encapsulate in a Compiled Block can be hard to predict. I follow a few hunches and then test to see what works best.
APPROXIMATE WHAT YOU CAN AND STAGE DETAIL/COMPLEXITY
If you don’t need a level of precision, then reduce precision by changing your settings or methods.
For example, running too high on memory? If you don’t need a 32bit float point attribute - floats are created by default in a wrangle as 32bit - declare it upstream or use an Attribute Cast to cast it down to a 16-bit one. Same goes for integers: don’t create loads of float attributes on your geometry because typing 'i@value' is so much more work than '@value' in wrangle.
With expensive processes, sometimes you can operate on a sparse set of data then apply to the full set downstream, or increment the detail (complexity) as you increment down the graph.
For example, you could be trying to procedurally model some cliffs. There’s some expensive vdb reshaping that needs to occur. Why not do this at a lower voxel density, then gradually introduce voxel density in stages as your layer more and more frequent details of noise. After all, there is no benefit in wasting resources resolving something to a detail stage that doesn’t meaningfully affect the output.
If you really need fast evaluation and feedback why not create an “Interactive” mode or output that processes a reduced input that’s enough to assess changes to inputs quickly, with the full input only being processed when required.
CLOSING REMARKS
It can feel like you are going backwards, but sometimes parts of your algorithm may need to perform slower to allow others to perform better, and the introduction of new steps are necessary to pave the way for more efficient methods.
At each stage, test how your changes affect performance and take a holistic view.
Record the results and make notes. A surprising combination of approaches may achieve the best performance - one which was not foreseeable at the start. Your notes will make sure your preconceptions don’t make you overlook previously demonstrated results.
We are dealing with very limited information of what is actually happening in Houdini and the computer system it is running on. All we can really do is try to express our algorithm in such a way in Houdini that our machine can utilise its resources fully, and make our actual instructions efficient, and then see what works.
With any luck my process will help you get what you need, or inform you on your own journey of finding what works for you. No doubt I’ll be adding steps to this merry jig over time.
Anyway, if you enjoyed the article consider subscribing and follow me on Twitter @Does3D for more. I’d love to see what you’re up to.
FURTHER READING AND NOTES
SOP SPUR EVALUATION ORDER
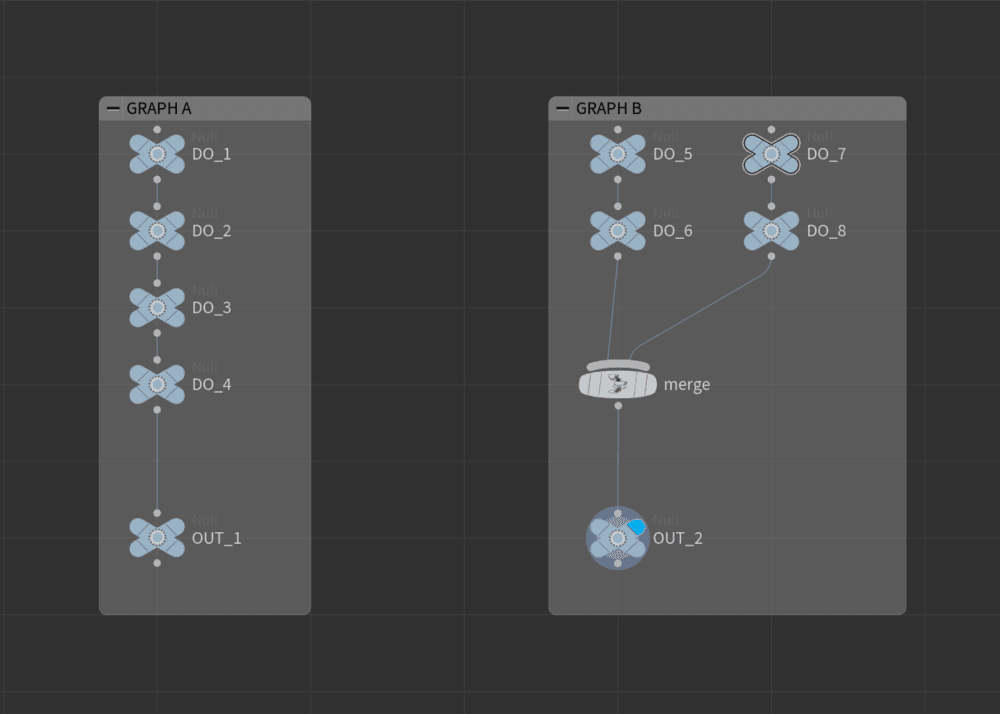
To dispell any confusion, let me illustrate how SOP graphs evaluate as of writting this article - Houdini 18.5.
Lets take 2 Sop networks: Graph A and Graph B shown in Figure C.
Graph A will execute as follows DO_1, DO_2, DO_3, DO_4 as one might expect.
Graph B will evaluate as DO_5, DO_6, DO_7, DO_8, merge. The left and right spurs will not evaluate in parallel. Houdini assumes there might be dependacies between these 2 spurs of nodes. This allows for complex depedancies outside of node connections - for example parameter expressions.
It is possible to get Graph B to evaluate in parallel using for loops and compile blocks, but I’ll leave that for a future article! Let me know if you’d like to see it.
Figure C.
OPENCL
Houdini has a Sop OpenCl node. If you enable “use snippet” it can be used much like a VEX snippet - except its a different syntax. It also is used in other places and contexts. Like VEX it has the convenience of being able to be compiled at run time and is a C type language. It can out perform VEX in very specific cases.
Unlike VEX, OpenCl uses your GPU rather than your CPU. Generally speaking, there are not the safety nets provided by Sidefx in OpenCl. I’ll let Jeff Lait tell you more...
OpenCL | Jeff Lait | Houdini 16.5 Masterclass: https://vimeo.com/241568199
KEY HOUDINI DOCS
Looping In Sops: https://www.sidefx.com/docs/houdini/model/looping.html
Compile Blocks: https://www.sidefx.com/docs/houdini/model/compile
Houdini 16 Masterclass Compiled SOPs: https://vimeo.com/222881605
Loop and flow control in VEX: https://www.sidefx.com/docs/houdini/vex/statement.html
LEARNING BY EXAMPLE - CONVEX HULL ALGORITHMS
By looking at different algorithms you get some insight into how they can be staged and structured in different ways to perform better in different scenarios. Personally, I found looking at convex hull algorithms really eye opening. Maybe they will be for you?
https://en.wikipedia.org/wiki/Convex_hull_algorithms
BIG-O NOTATION
This is a method to describe how the computation and/or memory cost increases as the scale of input increases of an algorithm -something we touch on in this article. Want to learn more?
Kahn Academy’s great article: https://www.khanacademy.org/computing/computer-science/algorithms/asymptotic-notation/a/big-o-notation
Here’s a good article from Rob Bell illustrating it through code - https://rob-bell.net/2009/06/a-beginners-guide-to-big-o-notation
A NOTE ON RECURSION
As VEX and OpenCL do not support recursion, and a node graph in Houdini cannot express recursion - unless forced through Python - I skipped over recursion.
It is however an important concept in Computer Science and creating algorithms so I’ll take this opportunity to introduce it here.
Going back to our root to tip branching example, we could define a function that given a start point would step though parent to child until the tip was reached, incrementing a counter at each step and setting the each point as it went. When it encountered a fork it would call itself, passing on the current counter value, to start a new process to traverse down the hierarchy.
A function calling itself recursively like this is known as recursion.
Recursion usually occurs serially, though it’s possible to be threaded (run concurrently or simultaneously) in some programming languages.
In Houdini, Recursion can be achieved through Python and HDK in C++.
Python is relatively slow to execute when compared to VEX so it should not be used to process large amounts of Data. It can however be used effectively with recursion:
- at a higher level to recursively trace through scenes to give information on nodes of Environment.
- to perform nuanced logic on light amounts of data, for example to create “good” initial settings on a tool. It should be used to create, modify or query geometry in only the most limited ways.
- force recursion in node graph.
In contrast C++ in HDK scales very well and is very fast. But being a compiled language, it is very difficult to develop and deploy and has less safety nets. Unless you have pre-existing C++ experience or support from a Software Engineer, it only usually fits inside the most long term development projects.